Check your Rewards Here!

Take Time to Unwind!
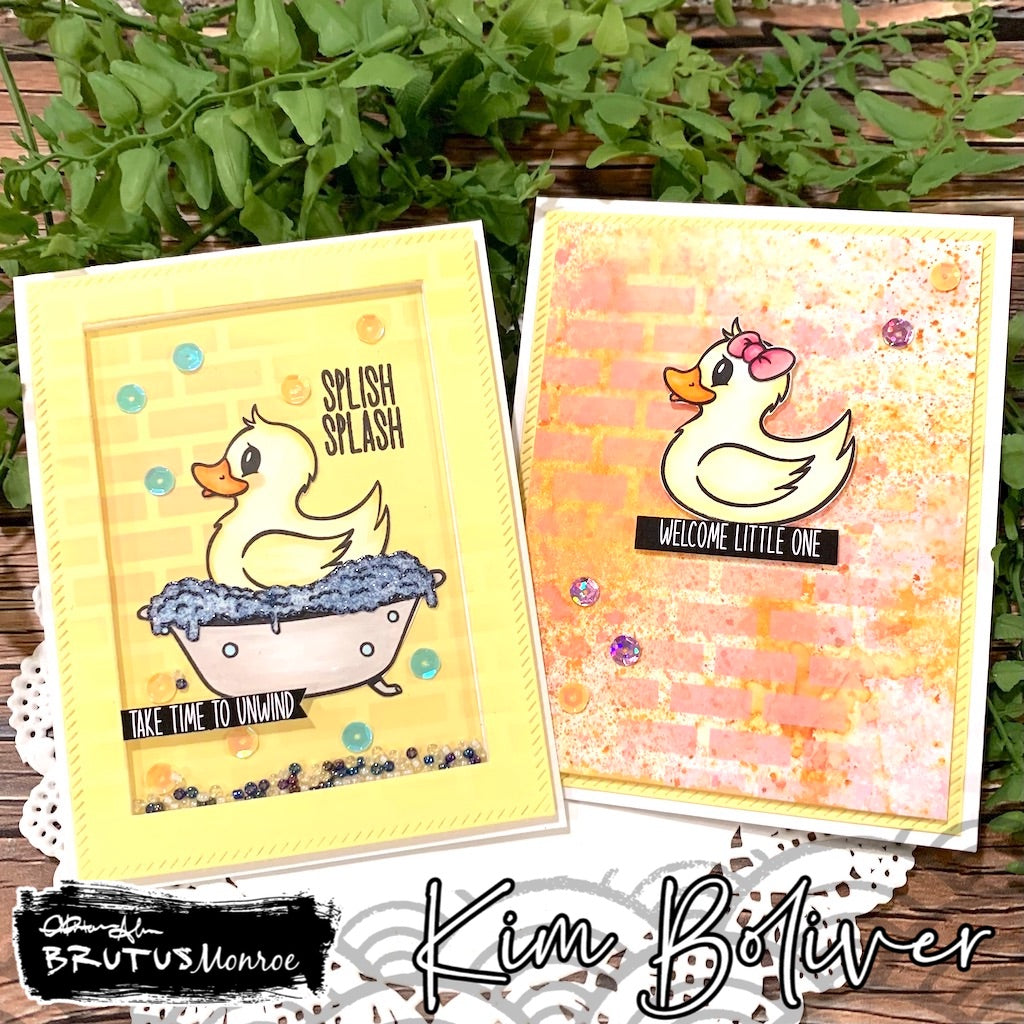
Hello friends!! Kimberly here and I am so excited to be writing my first blog post for Brutus Monroe!!! I have two cards to share using the products from the Splash Splash Subscription Box along with a couple of other products you can find at Brutus Monroe.

I am so in love with this adorable duck!! This box has so much wonderful goodness in it and these cards only feature a few of the products! It is such an amazing deal!

To make this shaker card, I started with the yellow cardstock provided in the Splash Splash box and die cut it using the Diagonal Stitched rectangle die. I blended Kitsch Flamingo distress oxide ink through parts of the brick stencil that was included in the box. I made some areas a little darker than others. Next, to make the frame, I cut the center out with a smaller rectangle die. To make sure I had the inside rectangle centered, I lined the yellow frame up on the card base and glued down the center rectangle while everything was lined up. Then, I removed the yellow frame, glued a piece of acetate to the back of it and set it aside to dry.
To make the scene, I stamped the duck, bathtub, and bubbles from the Splash Splash stamp set using Raven ink. I colored in the images with Copic markers (colors listed below) and fussy cut them out. There are coordinating Splash Splash dies, but this time I decided I didn't want the white border. Next, I smooshed the bubbles in embossing ink and embossed it with the embossing powder that was included in the Splash Splash Box. I love how the bubbles look with the blue sparkle!

I arranged the images on the center rectangle and glued them down. Then I lined up my "splash splash" sentiment and stamped it on the panel, using my Misti and Raven ink. I glued some of the Splash Splash sequins, that was included in the box, to the panel. Once everything was dry, I added foam tape around the border of the panel to make the shaker.

I added beads from the Adventures at Sea embellishment set and adhered the frame with the acetate to the top of the foam. To finish this card, I added one of the sentiments from the sentiment strips in the Splash Splash box.
My next card is so sweet for a baby card. It is also a pretty quick card to make.

To begin, I die cut a piece of yellow cardstock that was provided in the Splash Splash Box and adhered it to a white card base. Then, I stamped the duck and a bow with Raven ink on white cardstock and colored them with Copic markers (colors listed below). I cut them out and put them to the side.
To make the fun pink and yellow back ground, I sprayed some Kitsch Flamingo oxide spray on a piece of watercolor paper. When I dry my ink sprays, I dry the cardstock from the front and the back.

It is very important to dry it with a heat gun before adding the next color so they do not mix. In this case, if they mixed, it would make an orange color but if you used two complimentary such as red and green, they would turn brown if you did not dry each color before applying the next. Once I dried the Kitsch Flamingo oxide spray, I sprayed Wild Honey distress stain and dried it with a heat gun.

To finish the background, I blended the Kitsch Flamingo Oxide ink through the brick stencil that is included in the subscription box. Next, I cut this panel down to 3 3/4" x 5", added foam tape and adhered it to the card base that I had prepared earlier. I cut the "welcome baby" sentiment from the sentiment strips included in the box and added foam tape to the back. Then, I glued the bow to the duck and added foam tape to the back of the duck. I added the sentiment and duck to the card and glued a few of the Splash Splash sequins to the card for some bling.

Copic colors:
Thank you so much for stopping by! I hope I inspired you to create something fun today!
Kimberly
Instagram: KimmieB16
Blog: Just Sayin' Cards
YouTube: KimmieB16

Leave a comment